Tuesday, February 28, 2012

Socks in the city

Hello, and happy Tuesday to everybody. I'm not sure if it's the lack of sleep or all these "punny" cards I've been making lately, but let me just apologize for my post title. I just got off work this morning after working 72 hours straight, and I gotta say I'm pretty glad to have a change of scenery. Today I have another card for this week's CAS-ual Fridays challenge. To see my other cards for this challenge, click here, here, and here. This is the challenge:
CFC41: Jest for the Pun of it.
Use a pun, or a sentiment in a silly way to create a joke, on your
Clean And Simple creation.

And now for the paper yummies:
This was actually the first thought that came to mind when this challenge was issued, but for some reason, it was the fourth to make it onto paper. I don't know why...because I LOVE this card! It's so simple, but I love the concept of this poor single sock, missing a mate. I was inspired by EAD Designs laundry room vinyl wall art. I printed the sentiment from my computer (font is "My Own Topher"), then cut the sock using the Cricut "Country Life" cartridge. The patterned papers are from Echo Park. I had these adorable tiny clothespins in my stash, and used red and white baker's twine for my clothesline. I finished off the card with some double lines around the edges with a black pen. Here's a close-up of my lil' lonely sock:

She's playing in these challenges:
CAS-ual Fridays CFC41: Jest for the pun of it
The Ribbon Carousel Challenge 42: Anything Goes
Less is More Week 56: Don't Scrap It
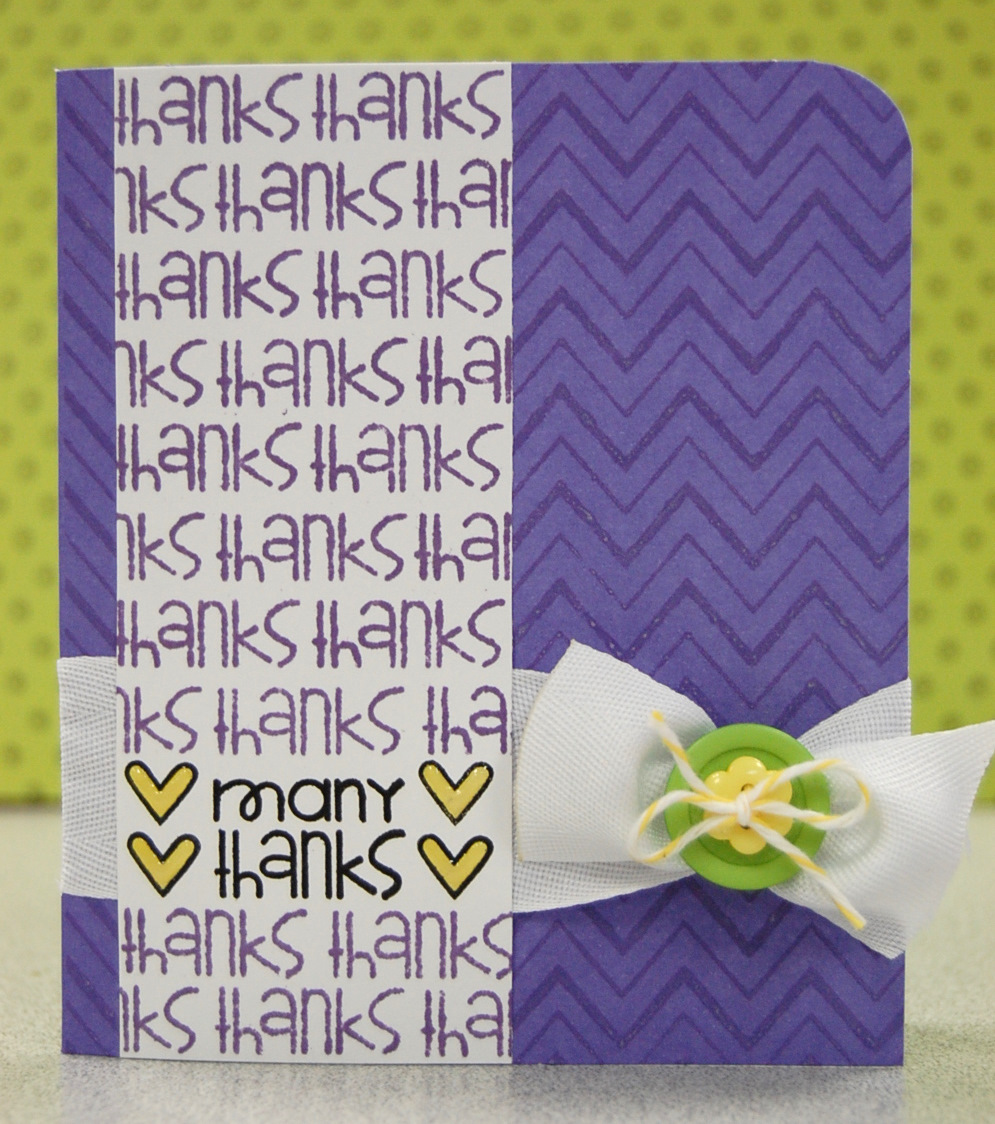
Thanks for looking!

Supplies: cardstock: Georgia Pacific; patterned papers: Echo Park; die cutting machine: Cricut Expression; Cricut cartridge: Country Life; sentiment: computer generated; clothespin: Loew Cornell; baker's twine: Divine Twine; hole punch: We R Memory Keepers; white pen: Signo Uniball; black pen: Hampton Art

Monday, February 27, 2012

Nice threads

Happy Monday! I hope everybody had a great weekend. Today I'm sharing my third card for this week's CAS-ual Fridays challenge. To see my first two cards, click here and here. Here is the challenge:

CFC41: Jest for the Pun of it.
Use a pun, or a sentiment in a silly way to create a joke, on your
Clean And Simple creation.

And now for the paper yummies:
When I originally thought of making this card, I knew I wanted to use a spool wrapped with baker's twine, but that was about all I had planned. So I found a little paper spool that came in a package of embroidery floss, and wrapped it with green and white baker's twine. It turned out really cute! Then I happened to flip through a DCWV paper pad, and found this PERFECT patterned paper! I mean, the colors, the theme...everything about it just *worked*. I stamped my sentiment using these awesome alphabet stamps from American Crafts (just in case the "ketchup" card sentiment was a fluke), and they stamped just as perfectly this time. I am TOTALLY sold on these stamps - they match up so perfectly every time to create a sentiment that looks computer-generated! I stitched around two sides of the patterned paper, then added some random stitching on the pattern itself. I added some ribbon, the spool of twine, and a cute little button. Here is a closer look at the spool:

I am entering this card here:
CAS-ual Fridays CFC41: Jest for the pun of it
Fab 'n' Funky Challenge 109: A colorful recipe (green, white, and blue)
Card Patterns Sketch 154
The Pixie Cottage Challenge 109: Buttons & Bows

Thanks for looking!

Supplies: cardstock: Recollections (kraft), Georgia Pacific (white); patterned paper: DCWV; stamps: American Crafts; ink: Tsukineko; scallop edge punch: EK Success; paper spool, button: craft supply; baker's twine: Divine Twine; ribbon: Offray; dimensional adhesive: American Crafts; sewing machine: Kenmore; thread: Singer

Sunday, February 26, 2012

Sorry. I suck.

I'm back with another card for the CAS-ual Fridays challenge this week (to see my first card for this challenge, click here). Again, here is the challenge:

CFC41: Jest for the Pun of it.
Use a pun, or a sentiment in a silly way to create a joke, on your
Clean And Simple creation.

Like I said in my last post, I had several ideas for a "punny" card, and still have a couple more I need to put to paper (I've made 4 cards for this challenge so far :)) I've had the Dryer stamp set from American Crafts for a little while, and only used a couple of the stamps. I've always thought that the vacuum was so cute, but could never really think of a use for it. Enter the CAS-ual Fridays "Jest for the pun of it" challenge. I finally had a use for the vacuum stamp, along with the perfect sentiment. Now for the paper yummies:

I printed the sentiment from my computer (font is "My Own Topher"). I wanted to paper-piece the vacuum bag, but the bag on the stamp is a solid image, not an outline, which wasn't very conducive to paper-piecing. To work around this, I stamped the vacuum onto my patterned paper using Versamark ink, then embossed it with clear embossing powder. That way, I could still see my patterned paper, but I could also see the outline of the image enough to cut around it. I adhered it over the black stamped image, then went around it with a black pen so that the black outline was uniform. I had never tried that before, but I'll definitely do it again! I finished off my card with some more patterned paper, baker's twine, a button, and some black Faux stitching using a pen.

I'm entering this card here:
The Pixie Cottage Challenge #109: Buttons & Bows

Thanks for looking!

Supplies: cardstock: Georgia Pacific; patterned papers: Echo Park; scallop edge punch: Fiskars; stamp: American Crafts; sentiment: computer-generated (My Own Topher font); ink: Versamark; clear embossing powder, black pen: Hampton Art; baker's twine: Divine Twine; button: craft supply; hole punch, corner rounder: We R Memory Keepers

Saturday, February 25, 2012

Simple Card Saturday - Let's ketchup!

This week at CAS-ual Fridays, the challenge is to create a CAS (clean and simple) card with a pun or joke-type sentiment. Now, I don't normally do "punny" cards, but I suddenly had a bunch of ideas in my head. I jotted down 6 ideas, and made 4 cards yesterday. I'll be posting them over the next couple of days, and hopefully be able to make the other 2 cards as well. Here's the challenge from CAS-ual Fridays:

CFC41: Jest for the Pun of it.
Use a pun, or a sentiment in a silly way to create a joke, on your
Clean And Simple creation.

And now for the paper yummies:

This lil' tomato from Unity Stamps is too cute! I got this set a few weeks ago, and have never used it. I thought he would be perfect stamped onto some patterned paper and, well, he is. The polka dot paper is from the Echo Park "Happy Days" 6x6 pad. Now, let's just stop for a second and talk about the sentiment...can you believe it was created with alphabet stamps?!? I'm really not trying to toot my own horn (because the stamps did all the work), but I think it totally looks like it was computer generated! It's an older set from American Crafts (called Ginger) that I happened to find recently at Tuesday Morning. I gotta say, American Crafts NAILED IT on this one. These individual letters stamp so crisply and match up perfectly to create a cursive word. I absolutely love them, and you'll be seeing them on another one of the punny cards I made yesterday. Ok, moving on...the bottom edge of the card was created by stamping this great border stamp by Mint Motif, then trimming around the lower edge of the stamp to create a scallop (I stamped it in white ink, then went over it with a white pen to make it more opaque and match my faux stitching). I added a strip of patterned paper underneath it, and finished off the card with some white dashed lines around the edges. Here's a closer view of my little tomato:

Love that lil' guy! Here's where he's playing along:
CAS-ual Fridays CFC41: Jest for the pun of it
Papercraft Star challenge 85: Something from your kitchen
Always Crafting Challenge #2: Anything goes
Also linking here:

Thanks for looking!

Supplies: cardstock: Recollections (kraft), Georgia Pacific (white for stamping/coloring); patterned paper: Echo Park; stamps: Unity Stamp Co. (tomato), American Crafts (sentiment), Mint Motif (border); inks: Tsukineko (black), Joann (white); marker: Prismacolor; white pen: Signo Uniball; corner rounder: We R Memory Keepers

Friday, February 24, 2012

CPS 253 - Beelated birthday wishes

Here is a card I made using a sketch from Card Positioning Systems, and a color challenge from Color Throwdown. Here are the four colors:

And here is the sketch:
I stretched the sketch to change the orientation of my card. I used an adorable digital stamp (FREE!) from Paper Smooches, and I paired it with one of their sentiment stamps from the Word Salad set. Now, the actual stamp spells belated properly, but I wanted to play off the bee theme, so I did some creative masking to change it to "beelated". I also stamped the words in a row instead of stacked, as they are on the stamp. You can see the stamp below:
And now for the paper yummies:

I have a whole pack of this cute bee patterned paper from American Crafts + Dear Lizzy, and I thought it would make the perfect background for this card, as well as a cute pattern for paper-piecing the bee. I left his little wings un-adhered, so I could raise them and make them dimensional. I used Glossy Accents on his eyes, and that's the only part I'm not completely satisfied with. For some reason, the eyes have TONS of bubble in them. I never shake my Glossy Accents, so I'm not sure why that happened. Oh well. Here's a close-up of my lil bee and his wings:
I am playing along here:
Crafty Emma's Store "Spots & Dots" challenge
Crafty Catz "I spy something beginning with B" challenge: bees, blue, birthday, bow
Paper Crafting Journey "Make it cute" challenge
Paper Pretties PWC194: use die cuts or punches challenge
Paper Sundaes birthday challenge
Simon Says Stamp "Use 3 different papers" challenge
The Sisterhood of Crafters "Getting digi with it" challenge

Thanks for looking!

Supplies: cardstock: Georgia Pacific (white), The Paper Company (blue, gray); patterned paper: American Crafts (orange is the back side); stamps: Paper Smooches; ink: Tsukineko; dies: Nestabilities by Spellbinders; die cutting machine: Cuttlebug by Provocraft; ribbon: American Crafts; Glossy Accents: Ranger; white pen: Signo Uniball; mini stapler: Ranger; corner rounder: We R Memory Keepers

Thursday, February 23, 2012

With Sympathy

Here is a card I made using my new "This & That Graceful" 6x6 pad from Echo Park. There are some really lovely patterns in this pad!!! And they are double sided. I thought these particular patterns would make a sympathy card that is sure to cheer anybody up. Luckily, I don't know anybody in need of a sympathy card, but they're great to have on hand. The light wood grain pattern is the back side of the large floral print, which has a great variety of colors. I used a stamp from Papertrey Ink, a Nestabilities die, and a scallop edge punch by Fiskars. Now for the paper yummies:
I am entering this card here:
Do You Stack Up "Distress" challenge
Ooh-la-la Creations Challenge #99
Simon Says Stamp "Use 3 different papers"

Thanks for looking!

Supplies: cardstock: Recollections (kraft), Georgia Pacific (white); patterned papers: Echo Park; stamp: Papertrey Ink; inks: Tsukineko (black), Ranger (distress); die: Nestabilities by Spellbinders; die cut machine: Cuttlebug by Provocraft; scallop edge punch: Fiskars; distressing tool: Imaginisce; ribbon: Hobby Lobby; button: craft supply; baker's twine: Divine Twine; sewing machine: Kenmore; thread: Singer; dimensional adhesive: American Crafts

Wednesday, February 22, 2012

Get your LEARN on

Here is a school-themed card I made using the "A Boy's Life" 6x6 paper pad from Echo Park. This pad has so many great, usable patterns in it. I thought that this letter pattern was too cool to not make a school-related card with it. I used the scraps from the paper to cut out "LEARN" with my craft knife (I also took a couple letters from an area of my background piece that I knew would be covered). I also used some Mint Motif stamps to create a star-shaped chipboard button and a little paper-pieced chipboard pencil, and some Hero Arts alpha stamps to complete my sentiment. Now for the paper yummies:


To create the star "button" (under the pencil), I stamped the star on chipboard and on the blue patterned paper. Then I cut out the blue star and adhered it onto the chipboard star. I cut out the chipboard star, punched two "button holes" in it with my Crop-a-dile Big Bite, then covered the star with Glossy Accents. For the pencil, I stamped on chipboard and onto the cute yellow striped patterned paper, then cut just the barrel of the pencil out of the yellow paper. I pieced it onto the barrel of the chipboard pencil, then colored the wood and eraser portions of the pencil with Prismacolor markers. I cut out the paper-pieced chipboard pencil, and secured it on top of the star with some baker's twine. I added silver Stickles to the part of the pencil that would be metal. I also added Glossy Accents to the letters in "LEARN". Here's a closer view:

I am entering this card here:
Little Red Wagon chipboard challenge

Thanks for looking!

Supplies: cardstock: Recollections; patterned papers: Echo Park; stamps: Mint Motif (writing line, star, pencil), Hero Arts (alphabet stamps); ink: Tsukineko; embossing powder, dimensional adhesive: American Crafts; markers: Prismacolor; scallop edge punch: EK Success; hole punch: We R Memory Keepers; Glossy Accents, glitter glue: Ranger; ribbon: craft supply; baker's twine: Divine Twine; craft knife: Fiskars; sewing machine: Kenmore; thread: Singer

Saturday, February 18, 2012

Simple Card Saturday - Make a wish

Happy Saturday (at least for a few more minutes)! This is my CAS card for the week, and I'm playing along with CAS-ual Fridays Challenge #40: Tie One On
CFC40: With Mardi Gras in a few days we thought it would be fun to have a gallery full of Clean And Simple Party cards with ribbon.

And now for the paper yummies:
This may have been the fastest card I've ever made, and I think it turned out pretty darn cute!
I'm also playing along at:
Cupcake Craft Challenges Entwined challenge

Thanks for looking!

Supplies: cardstock: Georgia Pacific; patterned paper: Echo Park; stamps: Papertrey Ink (sentiment), Hero Arts (star); ink: Clearsnap; corner rounder: We R Memory Keepers; ribbon: Ribbon Bowtique; button: craft supply; baker's twine: Divine Twine

Wednesday, February 15, 2012

CPS Day 15 & Paper Smooches Sparks - love

Whew! This is my final post for the day, as well as my card the final sketch for the Card Positioning Systems 5th anniversary celebration! YAY!!! And it's extra special because Kim Moreno hosted day 15, and I know her personally! We used to work together at a scrapbook store when she lived here. The girl is super talented, and finds time to create beautiful things while taking care of 5 kids. Go Kim! Here is the sketch she picked for day 15 (#231):
I also wanted to create another card for the Paper Smooches Sparks challenge. Here is the inspiration photo for that challenge:
I again was inspired by the felt and stitching, but this time I stuck more with the color and theme of the photo. I also incorporated some metal, inspired by the safety pin. And I tried a new technique (for me): stitching inside a stamped sentiment. Now for the paper yummies:

I stamped two different background patterns in two different ink colors instead of using papers. Then I stitched in between them with green thread. I stacked 3 felt hearts on top of this cute die-cut heart from The Girls' Paperie, then I stitched right up the middle of all of them with the same green thread. I wanted to incorporate some metal, but didn't have a cute little clothespin like the one in the photo. So I used my Tim Holtz Tiny Attacher and added some tiny staples. Here is a closer view of the hearts:

I stamped this cute sentiment from Paper Smooches "Word Salad", then I thought, "I wonder how that would look with green stitching in the middle?" Turns out - pretty cute! LOL! I think I may have to do that more often! Here's a closer view:

I tied some ribbon around the front of the card, using my new "short ribbon" trick, and added a button with some baker's twine. Then I adhered the stamped/stitched sentiment onto the ribbon:

I'm playing along with these challenges:
Paper Smooches Sparks challenge
Card Positioning Systems day 15 sketch
Fab 'n' Funky Challenge 108: Try something new (stitching inside a sentiment stamp)

Thanks for looking!

Supplies: cardstock: Georgia Pacific; patterned paper/heart die cut: The Girls' Paperie, stamps: Martha Stewart (backgrounds), Paper Smooches (sentiment); inks: Tsukineko (Pear Tart and Angel Pink Memento, Onyx Black Versafine); felt hearts: American Crafts; stapler: Tim Holtz Tiny Attacher; ribbon: The Ribbon Boutique; button: Buttons Galore; baker's twine: Divine Twine; sewing machine: Kenmore; thread: Singer

CPS Day 14 - be happy

Hello, everybody! I've got another post for you today, and that is my card for day 14 of the Card Positioning Systems 5th anniversary. And since this sketch can be clean and simple, I decided to make another card for the CAS-ual Fridays challenge this week. Here is the sketch (#45):
And here is the CAS-ual Fridays challenge for the week: paper piecing. YAY!
I just bought this stamp a few days ago, thinking that it would be PERFECT for paper piecing. And. it. is. I just decided to stick to 2 colors/patterns, but I think this stamp would also look cool with a different color/pattern for each layer (5 total). Now for the paper yummies:

The stamp is by Hampton Art, and it's paired with the sentiment stamp, so that was a no-brainer. I tried a new technique (for me), and that is stamping on the ribbon. I've run my ribbon through my printer before, but never stamped on it. I really like the way it turned out. I also really love all the different patterns in the flower stamp, especially the text in the outermost layer. TOO CUTE! Here is a closer view of the flower:

Playing along with these challenges:
Card Positioning Systems day 14 sketch
CAS-ual Fridays CFC39: Love Ya To Pieces *EDITED: I missed the deadline to submit this card to CAS-ual Fridays by a couple hours. Didn't realize Wednesday is the cut off. Whoopsie! *
Fab 'n' Funky Challenge 108: Try Something New

Thanks for looking!

Supplies: card base: The Paper Studio; patterned papers: October Afternoon; stamps: Hampton Art; ink: Tsukineko, ribbon: Michael's; corner rounder: We R Memory Keepers; brad: craft supply

CPS Day 13 and Paper Smooches Sparks - welcome lil' dude

I'm back with my card for day 13 of the Card Positioning Systems 5th anniversary celebration. I loved this sketch the first time it was featured on CPS, so I was very excited when Lea chose it for her sketch. See, I knew I wanted to make a baby card based on the Paper Smooches Sparks challenge, and this sketch just fit my idea perfectly. Here's the CPS sketch (#121):And here's the inspiration photo from the Paper Smooches Sparks challenge. I just love this puffy lil' felt heart with the stitching:
I was inspired by the felt and the stitching, but I took my card in a bit of a different direction, color-wise. I had just bought these cute little stitched felt embellishments the day I saw this challenge, so that worked out perfectly! And since I still only have 1 Paper Smooches stamp set, I'm challenging myself to find some not-so-obvious ways to use it. I wanted to make a baby card, but there's no baby-specific stamp in the Word Salad set. Hmmm...I was in a bit of a quandary. What to do...? Check out the paper yummies below to see how I created a baby card sentiment with non-baby stamps:

The Word Salad set has a "welcome" and a "dude" stamp, so I combined the two and then hand-wrote the "lil'" between the two stamped words. And since the inspiration photo had stitching in it, I added some stitching of my own around the card and the negative circle die cut, as well as with some stitched green ribbon. I love the way it turned out. Here is a closer view:
I'm entering this card here:
Card Positioning Systems 5th Anniversary Day 13
Paper Smooches Sparks Challenge
Crafty Emma's Store Lots of Layers challenge

Thanks for looking!

Supplies: card base (kraft): The Paper Studio; patterned papers: SEI (blue pattern, yellow stripes), We R Memory Keepers (multi-colored stripes); stamps: Paper Smooches; ink: Tsukineko; black pen (for handwritten "lil'"): Hampton Art; circle die: Spellbinders Nestabilities; die cutting machine: Cuttlebug; felt sailboat: Pebbles; corner rounder: We R Memory Keepers; ribbon: Making Memories; sewing machine: Kenmore; thread: Singer

CPS Day 12 - Welcome baby

Happy Wednesday! Here is my card for day 12 of the Card Positioning Systems 5th anniversary celebration. Here is the sketch (#118):
I just got the "Whale Wishes" stamp set and matching die from Papertrey Ink, and thought it would work really well with this sketch. I also thought that these papers from My Mind's Eye were so cute for a baby card - I especially LOVE those letters! I stamped the whale in gray ink, then applied Tim Holtz Distress Ink in Antique Linen to help the whale match the gray in the patterned papers. I curved the sentiment stamp on my acrylic block to match the curve on the circle die cut. Now for the paper yummies:

I added some straight gray stitching around the outer edge of the alphabet patterned paper, then zig-zag stitched around the circle. I stamped the little red hearts coming out of the whale's blow hole. I love this little guy! Here's a closer look:

I am also playing along with:
Paper Play Challenges "Love Letters" challenge
Crafty Emma's Store "Lots of Layers" challenge

Thanks for looking!

Supplies: card base: The Paper Studio; cardstock (for stamping): Georgia Pacific; patterned papers: My Mind's Eye; stamps: Papertrey Ink; whale die: Papertrey Ink; die cutting machine: Cuttlebug; ink: Memento (gray), Staz-On (red), Ranger (Tim Holtz Distress Ink); ribbon: craft supply; sewing machine: Kenmore; thread: Singer; dimensional adhesive: American Crafts

Tuesday, February 14, 2012

CPS Day 11 - many thanks

I'm back with my card for day 11 of Card Positioning Systems 5th anniversary celebration. Here is the sketch (#170):

I needed to make a thank you card for a very generous gal in the Hero Arts Flickr group (thanks again, Greta!), and I knew that I wanted to use the Hero Arts Zigzag background, but like I said in day 10's post, I just can't get enough Paper Smooches lately. And there's a super cute "many thanks" stamp in my poor lonely "Word Salad" set (can't wait to get my first installment of the PS club next month!), so I decided to have some fun using the "many thanks" with the zigzag. I rarely use purple in my projects, so I thought I'd challenge myself to do something I little different. I stamped the zigzag background onto a purple card base using Colorbox fluid chalk ink in Wisteria. I stamped the entire "many thanks" stamp onto a strip of white cardstock using black ink. Then I did a WHOLE bunch of masking (of "many") and stamping (of just "thanks") to create a background with many thanks on it, using Tim Holtz Distress Ink in Dusty Concord. And now for the paper yummies:

I stamped the cute little heart from the Word Salad set on either side of the "many thanks", then colored them yellow to match my button and baker's twine. I used the new trick that I "invented" for tying shorter ribbons, and added a couple of stacked buttons. I finished it off with some Glossy Accents on the little hearts. I think it turned out really cute. Here's a closer view:
I'm submitting this card to Paper Smooches March Guest Designer Search, and playing along at Cupcake Craft Challenges "Entwined" challenge. Thanks for looking!

Supplies: card base: Hampton Art; cardstock: Georgia Pacific; stamps: Hero Arts (background), Paper Smooches (sentiment, heart); ink: Tsukineko (black), Clearsnap (purple zigzag), Ranger (purple sentiments); dimensional glaze: Ranger; ribbon/buttons: craft supply; baker's twine: Divine Twine; corner rounder: We R Memory Keepers

Happy Valentine's Day

Happy Valentine's Day, everybody! I hope all of you had a great day with somebody you love. I know I did - my friend Amy and I headed up to Phoenix and hit up Hobby Lobby (or two). We showed them lots of love. LOL. Today I'm sharing a cute little card that's perfect for Valentine's Day, or just any day you want to tell somebody that you love them. Now for the paper yummies:
I'm playing along with a few challenges:
Cupcake Craft Challenges "Entwined" challenge
Ooh-la-la Creations "Be my Valentine" challenge
Paper Play Challenges "Love Letters" challenge
Frosted Designs "Love" challenge
Crafty Emma's Store "Lots of Layers" challenge

Thanks for looking!

Supplies: cardstock: Recollections (kraft), Georgia Pacific (white for stamping/coloring); patterned paper: Creative Imaginations; stamps: Hero Arts (background polka dots), Jillibean Soup (library card), TPC Studios (elephant), Hampton Art (sentiments); inks: Staz-On (fuchsia), Tsukineko (black); embossing powder: Hampton Art; markers: Prismacolor; distress ink: Tim Holtz; charm: Tim Holtz; heart punch: Hampton Art; glitter glue: Ranger; heart/scallop edge punch: Martha Stewart; corner rounder: We R Memory Keepers; ribbon/twine: craft supply; dimensional adhesive: American Crafts

Monday, February 13, 2012

CPS Day 10 - Lucky to have you

Happy Monday! I hope everybody had a great weekend. Here is my card for day 10 of Card Positioning Systems 5th anniversary celebration. I found this sketch a little challenging at first, like it was better suited for a scrapbook layout. I was worried my card would look too busy or something. Here is the sketch (#26):
I'm actually pretty darn pleased with the way my card turned out. And I don't think it looks too busy after all. I'm ALL about Paper Smooches Stamps right now (and actually just joined their monthly stamp club. Squeal!), so I wanted to incorporate some of their free digital stamps. I only own 1 of their stamp sets so far, and it's a cool sentiment set called Word Salad. But since I don't have any of their cute images to play with, so I find it super cool that they offer free digital stamps. I thought this little clover and "lucky to have you" sentiment were too cute, so I used both of them on my card. I also used to clover to create a background on my kraft card base. Now for the paper yummies:

I printed the big clover directly onto the cute green polka dot paper, and also onto white cardstock. I colored the white clover with my Prismacolor markers to match the lighter green color. Then I cut that clover out and paper pieced it onto the dotted clover. It looked cute, but didn't "pop" enough for my liking. So I took some lime green Stickles to it, and that did the job! I added some black machine stitching around the patterned papers, and popped the sentiment up with foam dots. I added some cute green gingham ribbon and a chipboard button. Here's a closer look:
I am also playing along with Lily Pad Cards patterned paper challenge, The Ribbon Carousel Anything Goes challenge, and entering this card in Paper Smooches March Guest Designer Search. Thanks for looking!

Supplies: cardstock: Recollections (kraft), Georgia Pacific (white); patterned papers: KI Memories; ribbon: American Crafts; chipboard button: Lily Bee Design; baker's twine: Divine Twine; dimensional adhesive: American Crafts; sewing machine: Kenmore; thread: Coats & Clark

Saturday, February 11, 2012

CPS Day 9 & Simple Card Saturday

Here is my third and final post for today (Whew! I don't think I've ever posted thrice in one day!). This week at CAS-ual Fridays, the challenge is clean and simple paper piecing, which I love to do. This is also my card for day 9 of Card Positioning Systems 5th anniversary celebration.
Here is the CPS sketch (#5, from way back in 2007!):

I really liked this sketch as soon as I saw it, and I knew exactly what I wanted to do. I couldn't wait to use the kite stamp from my new Hero Arts "Right at Home" set. First I stamped the Hero Arts cloud background, then stamped the kite right on top of it. Then I stamped the kite (minus the string) on each of four polka dot patterned papers by The Paper Studio. I cut each of the four section of the kite from a different color of patterned paper, and pieced them onto the kite that was stamped on the clouds. So CUTE! Now for the paper yummies:

The sentiment stamp is from the same set as the kite. I stamped it three times along a strip of patterned paper, then flag-cut the right end. I machine stitched around the clouds background with yellow thread, then I stitched right over the black ink of the kite and string with black thread. It may be difficult to see in the picture, but it's a fun way to add a little texture to the kite. Here's a close-up (click any picture to make it larger):
I'm also playing along at Hiding in My Craft Room #33: Super Scraps Saturday.
Thanks for looking!

Supplies: card base: The Paper Studio; cardstock: Georgia Pacific; patterned papers: The Paper Studio; stamps: Hero Arts; ink: Hampton Art (aqua), Tsukineko (black); buttons: craft supply: baker's twine: Divine Twine; corner rounder: We R Memory Keepers; sewing machine: Kenmore; thread: Singer (yellow), Coats & Clark (black)