Showing posts with label CPS sketch. Show all posts

Saturday, May 5, 2012

CPS 263 and Color Throwdown 190

Hello again!  I'm back with my second post for today (for my Simple Card Saturday post, click here).  For this card I used this week's sketch from Card Positioning Systems:

I also used this yummy color combination from Color Throwdown:

I actually liked this combination so much that this is the second card I made using it.  I'll be posting the first card I made tomorrow, and it's SUPER cute, so make sure you come back to see it!  Okay, for this card, I wanted to use a nice big "baby boy" stamp I got recently, and I thought it would be perfect for the large horizontal element in the card sketch.  So I created this paper yummy:
Man, I just love those colors together!  They work so perfectly for a baby boy card, but also for a feminine card.  In fact, the first card I made for this color challenge was a Mother's Day card, and I even used the exact same patterned papers too!  I'm definitely going to have to keep this combination in the ol' ideas file.

The baby stamp is from a Recollections (Michael's brand) set I got on clearance a few weeks back.  I love the subtle tiny polka dot pattern in the stamp.  I stamped it in Versamark ink, which looked good enough on that gray cardstock to leave it alone, but I'm glad I went with the mustard embossing powder.  It really pops, and matches the yellow paper perfectly!

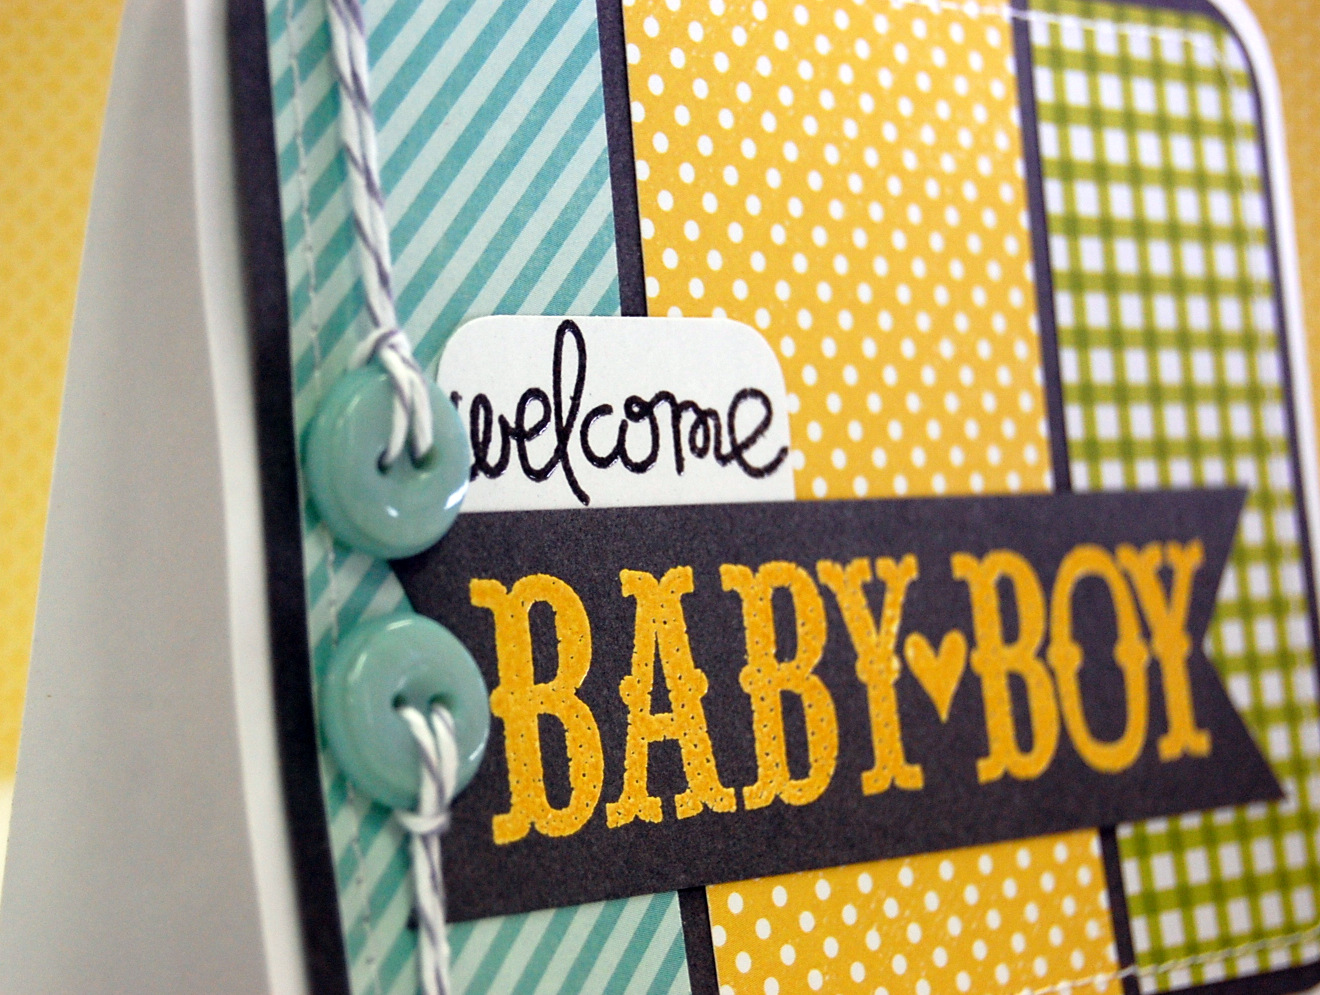
The "welcome" stamp is from the Paper Smooches Simply Said set.  It has the most awesome sentiments!  I embossed it with charcoal embossing powder.  I machine stitched around the edges of the patterned papers, then finished off the card with these perfect buttons and baker's twine:

Now I just need to find somebody who's expecting a boy... oh wait, that would mean I would actually be giving this card away. Never mind.

I'm playing along here:
Card Positioning Systems Sketch #263
Color Throwdown Challenge #190
CropStop Challenge #70: Emboss It (2nd entry)
Little Red Wagon Challenge #131: Stitch It Up (2nd entry)
One Stop Craft Challenge #181: Celebrations

Supplies: cardstock: Core'dinations (gray), Georgia Pacific (white); patterned papers: Echo Park (blue), My Mind's Eye (yellow), KI Memories (green); stamps: Recollections (baby boy), Paper Smooches (welcome); ink: Versamark; embossing powders: American Crafts; corner rounder, hole punch: We R Memory Keepers; baker's twine: Divine Twine; buttons: Buttons Galore & More; sewing machine: Kenmore; thread: Singer

Wednesday, March 14, 2012

CPS Sketch 256 & CAS-ual Fridays

Howdy! I hope everybody is having a great week so far. Today I made a card using this week's sketch from Card Positioning Systems. Here's the sketch:
I'm also playing along with the CAS-ual Fridays challenge:
I thought this would be another great opportunity to use my new Paper Smooches stamps again. Squeal! I'm just loving the March release, and I'm so glad I decided to join their monthly club! Now for the paper yummies:
I used the globe from the Smarty Pants set, along with the heart and sentiment from Word Salad. The patterned papers are by Echo Park. I colored the images in with Prismacolor markers, and added some Glossy Accents to the lil' heart. I added a couple lines of machine stitching, just because... Here's a closer look:
I'm playing along here:
Card Positioning Systems Sketch 256
CropStop Challenge 62: Rainbow of colors (use at least 4 colors - I used 5 if you count kraft)
Simon Says Stamp Challenge: A bit o' green

Thanks for looking!

Supplies: cardstock: Recollections; patterned papers: Echo Park; stamps: Paper Smooches; ink: Tsukineko; markers: Prismacolor; circle die: Nestabilities by Spellbinders; die cutting machine: Cuttlebug by Provocraft; corner rounder: We R Memory Keepers; Glossy Accents: Ranger; dimensional adhesive: American Crafts; sewing machine: Kenmore; thread: Singer

Friday, February 24, 2012

CPS 253 - Beelated birthday wishes

Here is a card I made using a sketch from Card Positioning Systems, and a color challenge from Color Throwdown. Here are the four colors:

And here is the sketch:
I stretched the sketch to change the orientation of my card. I used an adorable digital stamp (FREE!) from Paper Smooches, and I paired it with one of their sentiment stamps from the Word Salad set. Now, the actual stamp spells belated properly, but I wanted to play off the bee theme, so I did some creative masking to change it to "beelated". I also stamped the words in a row instead of stacked, as they are on the stamp. You can see the stamp below:
And now for the paper yummies:

I have a whole pack of this cute bee patterned paper from American Crafts + Dear Lizzy, and I thought it would make the perfect background for this card, as well as a cute pattern for paper-piecing the bee. I left his little wings un-adhered, so I could raise them and make them dimensional. I used Glossy Accents on his eyes, and that's the only part I'm not completely satisfied with. For some reason, the eyes have TONS of bubble in them. I never shake my Glossy Accents, so I'm not sure why that happened. Oh well. Here's a close-up of my lil bee and his wings:
I am playing along here:
Crafty Emma's Store "Spots & Dots" challenge
Crafty Catz "I spy something beginning with B" challenge: bees, blue, birthday, bow
Paper Crafting Journey "Make it cute" challenge
Paper Pretties PWC194: use die cuts or punches challenge
Paper Sundaes birthday challenge
Simon Says Stamp "Use 3 different papers" challenge
The Sisterhood of Crafters "Getting digi with it" challenge

Thanks for looking!

Supplies: cardstock: Georgia Pacific (white), The Paper Company (blue, gray); patterned paper: American Crafts (orange is the back side); stamps: Paper Smooches; ink: Tsukineko; dies: Nestabilities by Spellbinders; die cutting machine: Cuttlebug by Provocraft; ribbon: American Crafts; Glossy Accents: Ranger; white pen: Signo Uniball; mini stapler: Ranger; corner rounder: We R Memory Keepers

Wednesday, February 15, 2012

CPS Day 15 & Paper Smooches Sparks - love

Whew! This is my final post for the day, as well as my card the final sketch for the Card Positioning Systems 5th anniversary celebration! YAY!!! And it's extra special because Kim Moreno hosted day 15, and I know her personally! We used to work together at a scrapbook store when she lived here. The girl is super talented, and finds time to create beautiful things while taking care of 5 kids. Go Kim! Here is the sketch she picked for day 15 (#231):
I also wanted to create another card for the Paper Smooches Sparks challenge. Here is the inspiration photo for that challenge:
I again was inspired by the felt and stitching, but this time I stuck more with the color and theme of the photo. I also incorporated some metal, inspired by the safety pin. And I tried a new technique (for me): stitching inside a stamped sentiment. Now for the paper yummies:

I stamped two different background patterns in two different ink colors instead of using papers. Then I stitched in between them with green thread. I stacked 3 felt hearts on top of this cute die-cut heart from The Girls' Paperie, then I stitched right up the middle of all of them with the same green thread. I wanted to incorporate some metal, but didn't have a cute little clothespin like the one in the photo. So I used my Tim Holtz Tiny Attacher and added some tiny staples. Here is a closer view of the hearts:

I stamped this cute sentiment from Paper Smooches "Word Salad", then I thought, "I wonder how that would look with green stitching in the middle?" Turns out - pretty cute! LOL! I think I may have to do that more often! Here's a closer view:

I tied some ribbon around the front of the card, using my new "short ribbon" trick, and added a button with some baker's twine. Then I adhered the stamped/stitched sentiment onto the ribbon:

I'm playing along with these challenges:
Paper Smooches Sparks challenge
Card Positioning Systems day 15 sketch
Fab 'n' Funky Challenge 108: Try something new (stitching inside a sentiment stamp)

Thanks for looking!

Supplies: cardstock: Georgia Pacific; patterned paper/heart die cut: The Girls' Paperie, stamps: Martha Stewart (backgrounds), Paper Smooches (sentiment); inks: Tsukineko (Pear Tart and Angel Pink Memento, Onyx Black Versafine); felt hearts: American Crafts; stapler: Tim Holtz Tiny Attacher; ribbon: The Ribbon Boutique; button: Buttons Galore; baker's twine: Divine Twine; sewing machine: Kenmore; thread: Singer

CPS Day 14 - be happy

Hello, everybody! I've got another post for you today, and that is my card for day 14 of the Card Positioning Systems 5th anniversary. And since this sketch can be clean and simple, I decided to make another card for the CAS-ual Fridays challenge this week. Here is the sketch (#45):
And here is the CAS-ual Fridays challenge for the week: paper piecing. YAY!
I just bought this stamp a few days ago, thinking that it would be PERFECT for paper piecing. And. it. is. I just decided to stick to 2 colors/patterns, but I think this stamp would also look cool with a different color/pattern for each layer (5 total). Now for the paper yummies:

The stamp is by Hampton Art, and it's paired with the sentiment stamp, so that was a no-brainer. I tried a new technique (for me), and that is stamping on the ribbon. I've run my ribbon through my printer before, but never stamped on it. I really like the way it turned out. I also really love all the different patterns in the flower stamp, especially the text in the outermost layer. TOO CUTE! Here is a closer view of the flower:

Playing along with these challenges:
Card Positioning Systems day 14 sketch
CAS-ual Fridays CFC39: Love Ya To Pieces *EDITED: I missed the deadline to submit this card to CAS-ual Fridays by a couple hours. Didn't realize Wednesday is the cut off. Whoopsie! *
Fab 'n' Funky Challenge 108: Try Something New

Thanks for looking!

Supplies: card base: The Paper Studio; patterned papers: October Afternoon; stamps: Hampton Art; ink: Tsukineko, ribbon: Michael's; corner rounder: We R Memory Keepers; brad: craft supply

CPS Day 13 and Paper Smooches Sparks - welcome lil' dude

I'm back with my card for day 13 of the Card Positioning Systems 5th anniversary celebration. I loved this sketch the first time it was featured on CPS, so I was very excited when Lea chose it for her sketch. See, I knew I wanted to make a baby card based on the Paper Smooches Sparks challenge, and this sketch just fit my idea perfectly. Here's the CPS sketch (#121):And here's the inspiration photo from the Paper Smooches Sparks challenge. I just love this puffy lil' felt heart with the stitching:
I was inspired by the felt and the stitching, but I took my card in a bit of a different direction, color-wise. I had just bought these cute little stitched felt embellishments the day I saw this challenge, so that worked out perfectly! And since I still only have 1 Paper Smooches stamp set, I'm challenging myself to find some not-so-obvious ways to use it. I wanted to make a baby card, but there's no baby-specific stamp in the Word Salad set. Hmmm...I was in a bit of a quandary. What to do...? Check out the paper yummies below to see how I created a baby card sentiment with non-baby stamps:

The Word Salad set has a "welcome" and a "dude" stamp, so I combined the two and then hand-wrote the "lil'" between the two stamped words. And since the inspiration photo had stitching in it, I added some stitching of my own around the card and the negative circle die cut, as well as with some stitched green ribbon. I love the way it turned out. Here is a closer view:
I'm entering this card here:
Card Positioning Systems 5th Anniversary Day 13
Paper Smooches Sparks Challenge
Crafty Emma's Store Lots of Layers challenge

Thanks for looking!

Supplies: card base (kraft): The Paper Studio; patterned papers: SEI (blue pattern, yellow stripes), We R Memory Keepers (multi-colored stripes); stamps: Paper Smooches; ink: Tsukineko; black pen (for handwritten "lil'"): Hampton Art; circle die: Spellbinders Nestabilities; die cutting machine: Cuttlebug; felt sailboat: Pebbles; corner rounder: We R Memory Keepers; ribbon: Making Memories; sewing machine: Kenmore; thread: Singer

CPS Day 12 - Welcome baby

Happy Wednesday! Here is my card for day 12 of the Card Positioning Systems 5th anniversary celebration. Here is the sketch (#118):
I just got the "Whale Wishes" stamp set and matching die from Papertrey Ink, and thought it would work really well with this sketch. I also thought that these papers from My Mind's Eye were so cute for a baby card - I especially LOVE those letters! I stamped the whale in gray ink, then applied Tim Holtz Distress Ink in Antique Linen to help the whale match the gray in the patterned papers. I curved the sentiment stamp on my acrylic block to match the curve on the circle die cut. Now for the paper yummies:

I added some straight gray stitching around the outer edge of the alphabet patterned paper, then zig-zag stitched around the circle. I stamped the little red hearts coming out of the whale's blow hole. I love this little guy! Here's a closer look:

I am also playing along with:
Paper Play Challenges "Love Letters" challenge
Crafty Emma's Store "Lots of Layers" challenge

Thanks for looking!

Supplies: card base: The Paper Studio; cardstock (for stamping): Georgia Pacific; patterned papers: My Mind's Eye; stamps: Papertrey Ink; whale die: Papertrey Ink; die cutting machine: Cuttlebug; ink: Memento (gray), Staz-On (red), Ranger (Tim Holtz Distress Ink); ribbon: craft supply; sewing machine: Kenmore; thread: Singer; dimensional adhesive: American Crafts

Tuesday, February 14, 2012

CPS Day 11 - many thanks

I'm back with my card for day 11 of Card Positioning Systems 5th anniversary celebration. Here is the sketch (#170):

I needed to make a thank you card for a very generous gal in the Hero Arts Flickr group (thanks again, Greta!), and I knew that I wanted to use the Hero Arts Zigzag background, but like I said in day 10's post, I just can't get enough Paper Smooches lately. And there's a super cute "many thanks" stamp in my poor lonely "Word Salad" set (can't wait to get my first installment of the PS club next month!), so I decided to have some fun using the "many thanks" with the zigzag. I rarely use purple in my projects, so I thought I'd challenge myself to do something I little different. I stamped the zigzag background onto a purple card base using Colorbox fluid chalk ink in Wisteria. I stamped the entire "many thanks" stamp onto a strip of white cardstock using black ink. Then I did a WHOLE bunch of masking (of "many") and stamping (of just "thanks") to create a background with many thanks on it, using Tim Holtz Distress Ink in Dusty Concord. And now for the paper yummies:

I stamped the cute little heart from the Word Salad set on either side of the "many thanks", then colored them yellow to match my button and baker's twine. I used the new trick that I "invented" for tying shorter ribbons, and added a couple of stacked buttons. I finished it off with some Glossy Accents on the little hearts. I think it turned out really cute. Here's a closer view:
I'm submitting this card to Paper Smooches March Guest Designer Search, and playing along at Cupcake Craft Challenges "Entwined" challenge. Thanks for looking!

Supplies: card base: Hampton Art; cardstock: Georgia Pacific; stamps: Hero Arts (background), Paper Smooches (sentiment, heart); ink: Tsukineko (black), Clearsnap (purple zigzag), Ranger (purple sentiments); dimensional glaze: Ranger; ribbon/buttons: craft supply; baker's twine: Divine Twine; corner rounder: We R Memory Keepers

Monday, February 13, 2012

CPS Day 10 - Lucky to have you

Happy Monday! I hope everybody had a great weekend. Here is my card for day 10 of Card Positioning Systems 5th anniversary celebration. I found this sketch a little challenging at first, like it was better suited for a scrapbook layout. I was worried my card would look too busy or something. Here is the sketch (#26):
I'm actually pretty darn pleased with the way my card turned out. And I don't think it looks too busy after all. I'm ALL about Paper Smooches Stamps right now (and actually just joined their monthly stamp club. Squeal!), so I wanted to incorporate some of their free digital stamps. I only own 1 of their stamp sets so far, and it's a cool sentiment set called Word Salad. But since I don't have any of their cute images to play with, so I find it super cool that they offer free digital stamps. I thought this little clover and "lucky to have you" sentiment were too cute, so I used both of them on my card. I also used to clover to create a background on my kraft card base. Now for the paper yummies:

I printed the big clover directly onto the cute green polka dot paper, and also onto white cardstock. I colored the white clover with my Prismacolor markers to match the lighter green color. Then I cut that clover out and paper pieced it onto the dotted clover. It looked cute, but didn't "pop" enough for my liking. So I took some lime green Stickles to it, and that did the job! I added some black machine stitching around the patterned papers, and popped the sentiment up with foam dots. I added some cute green gingham ribbon and a chipboard button. Here's a closer look:
I am also playing along with Lily Pad Cards patterned paper challenge, The Ribbon Carousel Anything Goes challenge, and entering this card in Paper Smooches March Guest Designer Search. Thanks for looking!

Supplies: cardstock: Recollections (kraft), Georgia Pacific (white); patterned papers: KI Memories; ribbon: American Crafts; chipboard button: Lily Bee Design; baker's twine: Divine Twine; dimensional adhesive: American Crafts; sewing machine: Kenmore; thread: Coats & Clark

Saturday, February 11, 2012

CPS Day 9 & Simple Card Saturday

Here is my third and final post for today (Whew! I don't think I've ever posted thrice in one day!). This week at CAS-ual Fridays, the challenge is clean and simple paper piecing, which I love to do. This is also my card for day 9 of Card Positioning Systems 5th anniversary celebration.
Here is the CPS sketch (#5, from way back in 2007!):

I really liked this sketch as soon as I saw it, and I knew exactly what I wanted to do. I couldn't wait to use the kite stamp from my new Hero Arts "Right at Home" set. First I stamped the Hero Arts cloud background, then stamped the kite right on top of it. Then I stamped the kite (minus the string) on each of four polka dot patterned papers by The Paper Studio. I cut each of the four section of the kite from a different color of patterned paper, and pieced them onto the kite that was stamped on the clouds. So CUTE! Now for the paper yummies:

The sentiment stamp is from the same set as the kite. I stamped it three times along a strip of patterned paper, then flag-cut the right end. I machine stitched around the clouds background with yellow thread, then I stitched right over the black ink of the kite and string with black thread. It may be difficult to see in the picture, but it's a fun way to add a little texture to the kite. Here's a close-up (click any picture to make it larger):
I'm also playing along at Hiding in My Craft Room #33: Super Scraps Saturday.
Thanks for looking!

Supplies: card base: The Paper Studio; cardstock: Georgia Pacific; patterned papers: The Paper Studio; stamps: Hero Arts; ink: Hampton Art (aqua), Tsukineko (black); buttons: craft supply: baker's twine: Divine Twine; corner rounder: We R Memory Keepers; sewing machine: Kenmore; thread: Singer (yellow), Coats & Clark (black)

CPS Day 8 - Christmas

I'm back with my second post of the day: my card for day 8 of Card Positioning Systems 5th anniversary celebration. Here is the sketch (#102):
Again I went with a Christmas card, since I needed one more card to round out my Christmas in February card class. I got to use my new Christmas Word Block Stamp by Darkroom Door. I just love the look of white ink against kraft paper. I also used the ornament stamp from the Christmas Sentiments set by TPC Studio. I kept this card pretty simple, as the sketch lends itself to a CAS card. Now for the Paper Yummies:

Stampin' Up! Melon Mambo ink was a pretty close match to this patterned paper by GCD Studios. I punched the bottom edge of the patterned paper with a Martha Stewart punch (not sure of the name) that does both the scalloped edge and a little hole above each scallop. Then I hand-stitched some baker's twine through the punched holes. I finished it off with some white dashed lines around the ornament and the kraft cardstock. Here's a closer view:
I'm also playing along with Lily Pad Cards patterned paper challenge sponsored by Simon Says Stamp. Thanks for looking!

Supplies: cardstock: Georgia Pacific (white), Recollections (kraft); patterned paper: GCD Studios; stamps: Darkroom Door (background text), TPC Studio (ornament); inks: Stampin' Up! (melon mambo), Joann (white); edge punch: Martha Stewart; baker's twine: Divine Twine; white pen: Signo Uniball; corner rounder: We R Memory Keepers

CPS Day 7 - Merry Christmas

Happy Saturday! I have a couple posts coming your way today as I try to catch up on the Card Positioning Systems 5th anniversary celebration's 15 sketches. This is the sketch from day 7, and today they posted the 14th sketch. Eek! This is sketch #242:
I gotta be honest - this sketch challenged me a little bit. I knew I was going to do a Christmas theme so that I could also use this card in my upcoming Christmas in February card class. And I knew I wanted to use that cute little birdie and the branch, both by Hero Arts. And I had a bunch of this red cardstock pre-cut to this size from a previous class. For some reason, though, the card really didn't come together for me until I added those little black dashed lines around the die-cut piece and the strip of kraft cardstock with the scalloped edge. I am super pleased with the final result - I think it's pretty darn cute! Now for the paper yummies:

I embossed the red cardstock with my "Seeing Spots" Cuttlebug folder, and lightly went over the raised areas with some white ink. I used a Nestabilities die for the white cardstock piece, then stamped the lil' birdie and the branch underneath him. I colored them in with Prismacolor markers, then used some Frosted Lace Stickles to look like snow had fallen on them. The beautiful sentiment stamp is from Market Street Stamps "Essential Holiday Elegance" set. I stamped the little snowflake and embossed it with white powder, then punched it out with my Martha Stewart scalloped circle punch. Here is a little closer look at the "snow" (click on any picture to make it larger):

I'm also playing along with Christmas Card Challenges "Create your own background" challenge. Thanks for looking!

Supplies: cardstock: Georgia Pacific (white), Core'dinations (red), Recollections (kraft); stamps: Hero Arts (bird, branch), Market Street Stamps (sentiment), Hampton Art (snowflake); ink: Tsukineko (black Versafine, Versamark), Making Memories (white); embossing powder: American Crafts; markers: Prismacolor; die cut: Nestabilities by Spellbinders; embossing folder: Cuttlebug; die cut machine: Cuttlebug; scallop edge punch: EK Success; scallop circle punch: Martha Stewart; ribbon: Target; black pen: Recollections; glitter glue: Ranger

Friday, February 10, 2012

CPS Day 6 - Christmas Joy (and a trick for ribbon scraps)

Happy Friday! Today I have my card for day 6 of Card Positioning Systems 5th anniversary. I really liked this simple little sketch, and thought it would be perfect for my upcoming Christmas in February class at Real Deals. Yep... I said Christmas. This year I started a monthly Christmas card class where I teach 3 Christmas cards and one everyday card, so that by the time Christmas rolls around, you've built up a stash of cute, handmade cards and you don't have to scramble at the last minute. And you have some everyday cards to give along the way. Here is the sketch (#37):
For my card, I wanted to use my Happy Holidays stamp set from Hero Arts/Basic Grey's Nordic Holiday collection. Along those same lines, I chose some pretty patterned paper from GCD Studios' Scandia Jul collection. Now for the paper yummies:

While making this card, I invented (LOL) a new way to use a ribbon scrap that's not long enough to tie into a knot, much less a bow. I wrapped it around the card front, and used the baker's twine to secure the ribbon (in a half-knot) like you would a pony tail. Then I separated the two ends of the ribbon and pulled them in opposite directions (like when you separate your pony tail into two sections and pull them apart from one another to make the hair band tighter). Then I brought the baker's twine to the top of the ribbon, threaded the two ends through a couple of stacked buttons, and tied the baker's twine into a bow, securing both the ribbon and the buttons. I thought it looked pretty cute, and I'll definitely be using this trick on future projects. Here's a closer picture:
I'm also playing along with Jingle Belles "All Buttoned Up" challenge
Thanks for looking!

Supplies: cardstock: Recollections (kraft), Georgia Pacific (white), Core'dinations; patterned paper: GCD Studios; stamps: Hero Arts/Basic Grey; inks: American Crafts (green), Joann (white); embossing powder: Hampton Art; white pen: Signo Uniball; edge punch: Fiskars; ribbon: Michael's; baker's twine: Divine Twine: buttons: craft supply; sewing machine: Kenmore; thread: Singer