Showing posts with label Lily Pad Cards challenge. Show all posts

Wednesday, February 22, 2012

Get your LEARN on

Here is a school-themed card I made using the "A Boy's Life" 6x6 paper pad from Echo Park. This pad has so many great, usable patterns in it. I thought that this letter pattern was too cool to not make a school-related card with it. I used the scraps from the paper to cut out "LEARN" with my craft knife (I also took a couple letters from an area of my background piece that I knew would be covered). I also used some Mint Motif stamps to create a star-shaped chipboard button and a little paper-pieced chipboard pencil, and some Hero Arts alpha stamps to complete my sentiment. Now for the paper yummies:


To create the star "button" (under the pencil), I stamped the star on chipboard and on the blue patterned paper. Then I cut out the blue star and adhered it onto the chipboard star. I cut out the chipboard star, punched two "button holes" in it with my Crop-a-dile Big Bite, then covered the star with Glossy Accents. For the pencil, I stamped on chipboard and onto the cute yellow striped patterned paper, then cut just the barrel of the pencil out of the yellow paper. I pieced it onto the barrel of the chipboard pencil, then colored the wood and eraser portions of the pencil with Prismacolor markers. I cut out the paper-pieced chipboard pencil, and secured it on top of the star with some baker's twine. I added silver Stickles to the part of the pencil that would be metal. I also added Glossy Accents to the letters in "LEARN". Here's a closer view:

I am entering this card here:
Little Red Wagon chipboard challenge

Thanks for looking!

Supplies: cardstock: Recollections; patterned papers: Echo Park; stamps: Mint Motif (writing line, star, pencil), Hero Arts (alphabet stamps); ink: Tsukineko; embossing powder, dimensional adhesive: American Crafts; markers: Prismacolor; scallop edge punch: EK Success; hole punch: We R Memory Keepers; Glossy Accents, glitter glue: Ranger; ribbon: craft supply; baker's twine: Divine Twine; craft knife: Fiskars; sewing machine: Kenmore; thread: Singer

Wednesday, February 15, 2012

CPS Day 14 - be happy

Hello, everybody! I've got another post for you today, and that is my card for day 14 of the Card Positioning Systems 5th anniversary. And since this sketch can be clean and simple, I decided to make another card for the CAS-ual Fridays challenge this week. Here is the sketch (#45):
And here is the CAS-ual Fridays challenge for the week: paper piecing. YAY!
I just bought this stamp a few days ago, thinking that it would be PERFECT for paper piecing. And. it. is. I just decided to stick to 2 colors/patterns, but I think this stamp would also look cool with a different color/pattern for each layer (5 total). Now for the paper yummies:

The stamp is by Hampton Art, and it's paired with the sentiment stamp, so that was a no-brainer. I tried a new technique (for me), and that is stamping on the ribbon. I've run my ribbon through my printer before, but never stamped on it. I really like the way it turned out. I also really love all the different patterns in the flower stamp, especially the text in the outermost layer. TOO CUTE! Here is a closer view of the flower:

Playing along with these challenges:
Card Positioning Systems day 14 sketch
CAS-ual Fridays CFC39: Love Ya To Pieces *EDITED: I missed the deadline to submit this card to CAS-ual Fridays by a couple hours. Didn't realize Wednesday is the cut off. Whoopsie! *
Fab 'n' Funky Challenge 108: Try Something New

Thanks for looking!

Supplies: card base: The Paper Studio; patterned papers: October Afternoon; stamps: Hampton Art; ink: Tsukineko, ribbon: Michael's; corner rounder: We R Memory Keepers; brad: craft supply

CPS Day 13 and Paper Smooches Sparks - welcome lil' dude

I'm back with my card for day 13 of the Card Positioning Systems 5th anniversary celebration. I loved this sketch the first time it was featured on CPS, so I was very excited when Lea chose it for her sketch. See, I knew I wanted to make a baby card based on the Paper Smooches Sparks challenge, and this sketch just fit my idea perfectly. Here's the CPS sketch (#121):And here's the inspiration photo from the Paper Smooches Sparks challenge. I just love this puffy lil' felt heart with the stitching:
I was inspired by the felt and the stitching, but I took my card in a bit of a different direction, color-wise. I had just bought these cute little stitched felt embellishments the day I saw this challenge, so that worked out perfectly! And since I still only have 1 Paper Smooches stamp set, I'm challenging myself to find some not-so-obvious ways to use it. I wanted to make a baby card, but there's no baby-specific stamp in the Word Salad set. Hmmm...I was in a bit of a quandary. What to do...? Check out the paper yummies below to see how I created a baby card sentiment with non-baby stamps:

The Word Salad set has a "welcome" and a "dude" stamp, so I combined the two and then hand-wrote the "lil'" between the two stamped words. And since the inspiration photo had stitching in it, I added some stitching of my own around the card and the negative circle die cut, as well as with some stitched green ribbon. I love the way it turned out. Here is a closer view:
I'm entering this card here:
Card Positioning Systems 5th Anniversary Day 13
Paper Smooches Sparks Challenge
Crafty Emma's Store Lots of Layers challenge

Thanks for looking!

Supplies: card base (kraft): The Paper Studio; patterned papers: SEI (blue pattern, yellow stripes), We R Memory Keepers (multi-colored stripes); stamps: Paper Smooches; ink: Tsukineko; black pen (for handwritten "lil'"): Hampton Art; circle die: Spellbinders Nestabilities; die cutting machine: Cuttlebug; felt sailboat: Pebbles; corner rounder: We R Memory Keepers; ribbon: Making Memories; sewing machine: Kenmore; thread: Singer

Monday, February 13, 2012

CPS Day 10 - Lucky to have you

Happy Monday! I hope everybody had a great weekend. Here is my card for day 10 of Card Positioning Systems 5th anniversary celebration. I found this sketch a little challenging at first, like it was better suited for a scrapbook layout. I was worried my card would look too busy or something. Here is the sketch (#26):
I'm actually pretty darn pleased with the way my card turned out. And I don't think it looks too busy after all. I'm ALL about Paper Smooches Stamps right now (and actually just joined their monthly stamp club. Squeal!), so I wanted to incorporate some of their free digital stamps. I only own 1 of their stamp sets so far, and it's a cool sentiment set called Word Salad. But since I don't have any of their cute images to play with, so I find it super cool that they offer free digital stamps. I thought this little clover and "lucky to have you" sentiment were too cute, so I used both of them on my card. I also used to clover to create a background on my kraft card base. Now for the paper yummies:

I printed the big clover directly onto the cute green polka dot paper, and also onto white cardstock. I colored the white clover with my Prismacolor markers to match the lighter green color. Then I cut that clover out and paper pieced it onto the dotted clover. It looked cute, but didn't "pop" enough for my liking. So I took some lime green Stickles to it, and that did the job! I added some black machine stitching around the patterned papers, and popped the sentiment up with foam dots. I added some cute green gingham ribbon and a chipboard button. Here's a closer look:
I am also playing along with Lily Pad Cards patterned paper challenge, The Ribbon Carousel Anything Goes challenge, and entering this card in Paper Smooches March Guest Designer Search. Thanks for looking!

Supplies: cardstock: Recollections (kraft), Georgia Pacific (white); patterned papers: KI Memories; ribbon: American Crafts; chipboard button: Lily Bee Design; baker's twine: Divine Twine; dimensional adhesive: American Crafts; sewing machine: Kenmore; thread: Coats & Clark

Saturday, February 11, 2012

CPS Day 8 - Christmas

I'm back with my second post of the day: my card for day 8 of Card Positioning Systems 5th anniversary celebration. Here is the sketch (#102):
Again I went with a Christmas card, since I needed one more card to round out my Christmas in February card class. I got to use my new Christmas Word Block Stamp by Darkroom Door. I just love the look of white ink against kraft paper. I also used the ornament stamp from the Christmas Sentiments set by TPC Studio. I kept this card pretty simple, as the sketch lends itself to a CAS card. Now for the Paper Yummies:

Stampin' Up! Melon Mambo ink was a pretty close match to this patterned paper by GCD Studios. I punched the bottom edge of the patterned paper with a Martha Stewart punch (not sure of the name) that does both the scalloped edge and a little hole above each scallop. Then I hand-stitched some baker's twine through the punched holes. I finished it off with some white dashed lines around the ornament and the kraft cardstock. Here's a closer view:
I'm also playing along with Lily Pad Cards patterned paper challenge sponsored by Simon Says Stamp. Thanks for looking!

Supplies: cardstock: Georgia Pacific (white), Recollections (kraft); patterned paper: GCD Studios; stamps: Darkroom Door (background text), TPC Studio (ornament); inks: Stampin' Up! (melon mambo), Joann (white); edge punch: Martha Stewart; baker's twine: Divine Twine; white pen: Signo Uniball; corner rounder: We R Memory Keepers

Thursday, February 9, 2012

CPS Day 5 - i love you always

Happy Thursday! I'm back with my card for day 5 of the Card Positioning Systems anniversary celebration. Here is the sketch (#38):For my card, I wanted to incorporate some more cute stamps from Paper Smooches. The "i love you" and "always" are from the Word Salad set, and the cute little hearts with the arrow through them is this month's (FREE!) digital stamp from Paper Smooches. Now for the paper yummies:
I printed the digital stamp on some of that cute gray polka dot paper from yesterday's card, but the gray didn't quite match the grays in my other patterned papers, so I darkened the paper slightly using my Prismacolor markers. I also printed the image on white cardstock so that I could paper piece the hearts and still see the arrow on the white cardstock. I stamped "i love you" on the hearts, and embossed them with white powder. Then I used a white Signo pen to doodle on the hearts and color the overlap between the two hearts. I stamped "always" beneath the hearts and embossed them with charcoal powder.
I'm also playing along with Lily Pad Cards patterned paper challenge and Paper Smooches March Designer search. Thanks for looking!

Supplies: cardstock: Recollections (kraft), Georgia Pacific (white); patterned papers: American Crafts (strips), Pink Paislee (hearts), stamps: Paper Smooches; ink: Tsukineko; embossing powder: American Crafts; edge punch: Fiskars; eyelet ribbon: Offray; white pen: Signo Uniball; corner rounder: We R Memory Keepers

Wednesday, February 8, 2012

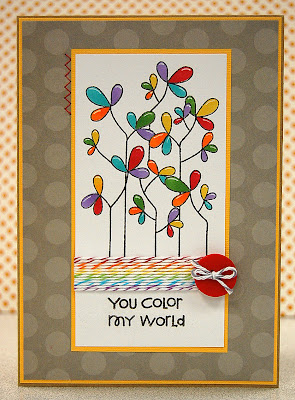
CPS Day 4 - You color my world

Here is my card for day 4 of the Card Positioning Systems 5th anniversary celebration. I enjoyed this simple sketch, and my card came together pretty smoothly. Here is the sketch:
For the card I wanted to use some new stamps I got, so I stamped this cute flowery image from Hampton Art and colored it in with Prismacolor markers, then highlighted with my white Signo Uniball pen. Then I stamped the cute little sentiment from Paper Smooches down below, leaving enough room for a bunch of different colors of baker's twine. I stamped both stamps with Versamark ink and embossed with American Crafts embossing powder in charcoal to coordinate with the gray-on-gray polka dot paper by Pink Paislee. Now for the paper yummies:

I think it turned out pretty darn cute, and I love the rainbow of baker's twine. I will also be submitting this to Paper Smooches for their March guest designer search, and playing along at Lily Pad Cards patterned paper challenge and 365 Cards Marvelous Markers challenge.

Thanks for looking!

Supplies: card base (kraft): The Paper Studio; cardstock: Core'dinations (yellow), Georgia Pacific (white); patterned paper: Pink Paislee; stamps: Hampton Art (image), Paper Smooches (sentiment); ink: Tsukineko; embossing powder: American Crafts; markers: Prismacolor; white pen: Signo Uniball; baker's twine: Divine Twine; button: Joann; sewing machine: Kenmore; thread: Singer

Tuesday, February 7, 2012

CPS Day 3 - Thank you shabby chic card

I've been working feverishly to catch up with the Card Positioning Systems daily sketches in celebration of their 5th anniversary. I'm going to *try* to complete all 15. Here is the sketch from day three:I had a pretty tough time with this sketch, since my very linear brain doesn't like things to be skewed or diagonal - even when following a sketch. And I know you don't have to follow each sketch exactly, but I'm trying to go outside my "straight-lined" box. After a lot of changes in plans for this card, I REALLY love it. I've been making a lot of cutesy cards lately, and I just love the shabby chic vintage style of this one. Last week I posted about Blue Moon Scrapbooking, and what great customer service they provide. The last time I shopped there, the owner gave me a My Mind's Eye stamp set that was a BRAND NEW release at CHA. I used the stamp set to make the staff a thank you card. Now for the paper yummies:
The large stamp and the linear stamp (dots/dashes/triangles) are from the new "Follow Your Heart" line by Rhonna Farrer. The stamp set is called "Be Amazing". The "thank you" stamp is Hero Arts, from the "Year Round Sentiments" set. I stamped the large image twice, to give it a bit of a shadow. First I stamped it with Tim Holtz Distress Ink in Frayed Burlap (the same color I used to distress the edges of my paper). Then I stamped it again in black Versafine ink. You might be able to see the shadow better in the 3rd picture below.

I used a strip of muslin in place of ribbon, tied it in a bow, and pushed a stick-pin through the knot (**TIP: place a clear earring-back on the tip of your stick-pin so you don't poke somebody's eye out. I buy mine at Micheal's**). I've had these little heart stick-pins for years, and they're kind of a peachy/orangy color. I colored the heart with a Prismacolor marker to match the red stripes on the ledger paper. Both patterned papers are My Mind's Eye.
This next pic is a bit difficult to discern, but I tried Crackle Accents (like Glossy Accents, but it crackles) for the first time on this card. First, I colored in this little flower in the stamped image with a dark blue Prismacolor pencil, and blended it out with odorless mineral spirits. Then I applied the Crackle Accents, and somehow the crackle knew that it was on a flower! LOL! It's the weirdest thing - each petal cracked down the middle, and then outward, just like the veins on a real plant. I haven't tried it on anything else, to know if it always does that or not, but I really like the stuff so far.
I'm also playing along with Lily Pad Cards patterned paper challenge presented by Simon Says Stamp.

Thanks for looking!

Supplies: cardstock: Recollections; patterned papers: My Mind's Eye; stamps: My Mind's Eye, Hero Arts; ink: Ranger, Tsukineko; edge punch: EK Success; crackle glaze: Ranger; muslin: Joann; stick pin: Heidi Grace; marker, colored pencil: Prismacolor; mini staples: Tim Holtz Tiny Attacher; pearl: The Paper Studio; Piercing Bug (for faux stitching in lower right corner): EK Success; gray pen (faux stitching): American Crafts

CPS Day 2 - aeio...missing u

Hi, everybody! I'm back with my card for day 2 of the Card Positioning Systems 5 year anniversary celebration. Here is the sketch (#166):
I thought it would be fun to use the large circular element in the sketch as a window in the front of my card, with the smaller circle affixed to a piece of patterned paper that would "bridge" the window. Not sure if that is the best way to describe it or of that even makes sense (LOL), but you'll see what I'm talking about. I used my Nestabilities circle dies to cut the window and the sentiment piece, and I think it turned out really cute! Now for the paper yummies:

I used patterned paper by October Afternoon, and machine stitched with red thread around the edges. Here is a close-up of the window, showing how you can see through to the inside of the card. The sentiment and the heart are Hero Arts stamps from the Year Round Sentiments set. I stamped the heart on patterned paper, trimmed around it, adhered it under my sentiment, and applied Glossy Accents on top of it. SO CUTE!
I am also playing along with the Die Cutting Challenge in the Moxie Fab World and the Lily Pad Cards Patterned Paper challenge presented by Simon Says Stamp.

Thanks for looking!

Supplies: cardstock: Recollections (kraft), Core'dinations (red scallop strip at top); patterned papers: October Afternoon; stamps: Hero Arts; ink: Tsukineko; cutting dies: Nestabilities by Spellbinders; die cutting machine: Cuttlebug by Provocraft; scallop edge punch: Fiskars; dimensional glaze: Glossy Accents by Ranger; trim: Michael's; sewing machine: Kenmore; thread: Singer; buttons: Joann; twine: Offray

Monday, February 6, 2012

CPS Day 1 - You're the best

Card Positioning Systems is celebrating their 5th anniversary. Each day, for 15 days, one of their super talented designers picks her favorite sketch, which in itself seems like a difficult task since there are so many great sketches from which to choose. Then she makes a new card based on the sketch and posts it for all to enjoy. Everybody else who makes a card based on the sketch and links it to the CPS blog is entered to win a prize. For those that follow all 15 sketches, there is a drawing for an awesome prize package. I'm going to TRY to do all 15...they're already on day 9, and this is my card for day 1. Yes...number 1. But, I've actually made cards for days 1-5, so I'll be posting them over the next few days (when I'm not working on catching up. LOL). You can play along with the sketch here. Here is day 1, sketch #136:And now for the paper yummies. I made a square card instead of rectangular, but the rest of the elements are pretty true to the sketch. I got this stamp set by Mint Motif and couldn't wait to try it out!
I'm also playing along with the Lily Pad Cards Patterned Paper Challenge, presented by Simon Says Stamp, the Mismatched Challenge at 365 Cards, and the Anything Goes Challenge at Do You Stack Up?

Thanks for looking!

Supplies: Cardstock: Core'dinations, Recollections; patterned papers: American Crafts, October Afternoon; embossing folder, die cut machine: Cuttlebug by Provocraft; stamps: Mint Motif; ink: Clearsnap, Tsukineko; embossing powder: American Crafts; edge punch: EK Success; corner rounder: We R Memory Keepers; sanding block: Making Memories; trim: Michael's

Monday, January 30, 2012

Thank you for your friendship pocket card

Here is a pocket card I made for a scramble on the Hero Arts Flickr group. (A scramble is a 90 minute challenge where the hostess announces a theme or requirement for the card, and each person must make a card following the rules, photograph it, and upload it in 90 minutes.) For this scramble, each card must have had a.) ribbon, b.) pink, c.) a pocket, d.) at least one Hero Arts stamp, and e.) a "pop". I popped my button up on top of the knot of my bow. It was my first time playing along with a scramble, and it was a lot of fun, especially because the "pop" was a twist that was added 20 minutes into the challenge. I think Rachelle (the hostess this round) was trying to kill me. LOL. I will also be adding this to the patterned paper challenge at Lily Pad Cards and the "anything goes" challenge at the SimonSaysStamp blog. And now, the paper yummies:Thanks for looking!

Supplies: cardstock: Core'dinations, Recollections; patterned paper: Echo Park; stamp: Hero Arts; ink: Versamark by Tsukineko; embossing powder: American Crafts; scalloped circle punch: Martha Stewart; corner rounder: We R Memory Keepers; white pen: Signo Uniball; baker's twine: Divine Twine; ribbon, button: craft supply