Thursday, January 31, 2013

CFC88 - XO

Hello, and happy Friday!  I hope you all had a wonderful week - I know I did ;)  I'm here today with a new challenge from the CAS-ual Fridays blog!  Woo hoo!
CFC88: Love Letters
Use alpha stamps, dies, stickers, etc. on your clean and simple project

And the sponsor for this week's challenge is once again the fabulous Ellen Hutson!  The winner of this challenge will receive a $25 gift card to spend here!
So for this week's challenge, I chose to incorporate letters onto my card in a few different ways.  Check out this paper yummy:
The first (and most subtle way) I added letters to my card was by stamping the heart, which had x's and o's on it already.  I stamped it in red ink, cut it out, then colored over it with a red Copic marker.  The next way I incorporated text was on my tag.  I stamped the tag (from this stamp set) onto some text patterned paper by Stampin' Up!, then cut out the tag.  For the card base, I cut down a piece of self-adhesive cork to be the same size as my card.  I "stamped" on the cork using a Cuttlebug folder!  Yep, I just applied black ink to the raised side of the embossing folder, then laid my cork face-down onto the inked portion.  It worked really well!  To finish off the card, I added some glittery stickers (from Making Memories) to the heart.  Here's a close-up:

I hope you will play along with this week's challenge!  You have until next Thursday at noon EST to do so.  Thanks so much for looking!

Supplies: card stock: Georgia Pacific; cork: Recollections; patterned paper: Stampin' Up!; stamps: Simon Says Stamp & Kelly Purkey (tag), Recollections (heart); inks: Tsukineko; marker: Copic; embossing folder: Cuttlebug; glitter alpha stickers: Making Memories; ribbon: Offray; corner rounder punch: We R Memory Keepers 
Thursday, January 24, 2013

CFC87 - Sunshine, peace & hope

Happy Friday!  I hope your week was wonderful! I'm here today with a card that I'm just giddy over, and it's my card for this week's CAS-ual Fridays challenge:
CFC87: Make your mark
Use markers on your clean and simple project

And this week's sponsor is Crafter's Companion, who is offering up an awesome Spectrum Noir markers prize package!

So for this challenge, I wanted to use one of the cutest stamps (in my opinion) that Paper Smooches makes.  I'd never used this particular stamp, but I think it's absolutely PERFECT for a spring time card, and also to send well wishes to a friend who's been going through a rough patch.  And now for the paper yummies:

I stamped the adorable lion and lamb stamp from the Eco-Friendly stamp set on white cardstock, colored it in with Copic markers, and fussy-cut it out.  I thought the lion looked so contented, as if the sun was shining down on him and his little lamb buddy.  So, on the white cardstock panel, I embossed a square Nestabilities die to create a frame.  I masked off the area outside the square, and stamped the sunshine in the upper left corner of the square.  With my Copics, I colored in the sunshine, then colored in the rest of the square to create a "sky".  I used a stamp from the Needle Little Love set to create the stitching around the edges of the frame.  The "wishing you sunshine" sentiment is from Eco-Friendly, and I added the "peace" and "hope" from the Joyful Greetings set. The big ampersand is from the We Connect set, and I stamped it in a shade of ink just slightly darker than the sky background.  Here's a close-up:
I hope you'll make your mark on this week's CAS-ual Fridays challenge!  You have until next Thursday at noon EST to play along!  Thanks so much for looking!

I'm also playing along with the inaugural Muse Card Club challenge.  My card was inspired by Amy Kolling's beautiful card at the Muse blog this week.  I loved her layout (I just reversed it on my card), the embossed square, and the fresh spring feel.


Supplies: cardstock: Copic X-Press Blending Cardstock; patterned paper: Echo Park; stamps: Paper Smooches (Eco-Friendly, Needle Little Love, Joyful Greetings, We Connect); inks: Tsukineko (Memento Tuxedo Black, Tangelo), Hero Arts (Soft Pool); markers: Copic; square die: Nestabilities by Spellbinders; die-cutting/embossing machine: Cuttlebug by Provocraft

Thursday, January 17, 2013

CFC86 - You are so sweet

Happy Friday!  Today is the day that 3 brand new stamp sets are being released in the CAS-ual Fridays Stamps store!  YAY!  You should totally go check them out, but first, check out this week's CAS-ual Fridays challenge!
CFC86: Long & short
Create a clean and simple project with one long side and one short side (for example, 3x6 or 4x8).

And this week's sponsor is CAS-ual Fridays Stamps!  How cool would it be to win some fantastic brand new stamps?!?

So for this week's challenge, I wanted to use the "masculine" new set ("Rad") to make a feminine card.  When I sneak-peeked this set in this post, I used it for a masculine birthday card, but mentioned that you'd see a cute girly card if you stayed tuned.  Well here it is, this paper yummy:

I used the adorable cloud die from the Simon Says Stamp Talk Bubbles die set, and die cut the cloud from some tiny chevron patterned paper by Basic Grey.  I created my sentiment using two stamps from the Rad set.  I stamped the words in Versamark ink, and embossed using white embossing powder.  I LOVE the way these words stamp so crisply, especially the outlined word "sweet".  I wasn't sure how well the white embossing would show up against a lighter pattern, but I'm super pleased with how it turned out.  This card just makes me happy!  I added some felt hearts from American Crafts, and finished off my card with some light pink stitching.  Here's a close-up of the cloud speech bubble and hearts:

I had so much fun making this non-traditional-sized card - I actually made two!  I hope you'll play along with this week's challenge.  You have until next Thursday at noon EST to do so.  And if you didn't come here from CAS-ual Fridays, please check out the challenge blog for some super exciting news, including a DT call!

Thanks for looking!

Tuesday, January 15, 2013

CAS-ual Fridays Sneak Peak Day 3 - RAD

Happy Wednesday!  Today I'm here to show you a sneak peek of one of the CAS-ual Fridays Stamps January release.  The set I'm showcasing is called Rad, and it most certainly is!  This set is perfect for all the boys in your life, but can also be used to make a really stinkin' cute girl's card (I made one today...stay tuned for that!)  Okay, on to the paper yummies:

Michele included a few outlined sentiments in this set (like the word awesome above) that are TO DIE FOR!!!  They stamp so crisply and cleanly, I can hardly stand it!  With all the different words in this set, you can create a TON of different sentiments.  And don't forget about that fun dot border I used along the left side - I sewed over the dashed line that connects them all.

This set is super fun, and will be available in the CAS-ual Fridays Stamps store at midnight EST on Friday, January 18th.  Leave a comment on the CAS-ual Fridays Stamps blog for your chance to win this set and the first two sets that were sneak-peeked!  A random commenter from each day will win that day's set, but you'd better hurry - comments close at midnight EST on Wednesday, January 16.  Good luck, and thanks for looking!

Friday, January 11, 2013

Paper Smooches Sneak Peeks

Happy Friday!  For this week's CAS-ual Fridays post, click here or scroll down.

If you're here for a Paper Smooches sneak peek, you've found the right place!  Thanks so much for hopping over!  I am over the moon excited that Kim invited me to help sneak peek her new product release!!!  Here are the deets:

Paper Smooches is showing off their CHA release during the entire month of January.  37 designers are participating along with the PS DT, so there will be a ton for projects to inspire you this month.  Paper Smooches is known for their fun and whimsical hand-drawn stamps.  They decided that it was time to broaden their product line to include DIES and wood mount stamps!  

I have a project to share using NEW PS product that releases on February 1, 2013 at www.papersmoochesstamps.com along with many retail stores around the globe.
You will find a new blog link (or two) to follow every day in January at the PS Blog
Paper Smooches is giving away $500 worth of product!  Hidden on FIVE of the participating blogs is a prize package worth $100 each. The prize includes a variety of stamp sets, wood mounts and dies.  Comment on as many blogs as you can to increase your chances to be one of the five winners.
Deadline is January 30th – winners will be announced on the PS Blog on January 31st.
The product I'm giving you a sneaky peek of is one of Kim's new dies, Prickly Bloom.  I've used it to create these paper yummies:

The large flower shape is the Prickly Bloom die.  I cut it from some fun polka-dot paper, then added some stamped stitching from the Santa Paws stamp set. For the stem, I used the clothesline from the Pip Squeaks set (which is also where the little heart is from), and the leaves are from Daisies & Paisleys.  The sentiment is from Flap Happy.  I stitched around the edges of a Ranger kraft tag, then added the stamping and die cut.  Here are some other views:


I also made a second card using the Prickly Bloom die:

On this card, I wanted to use the die cut as a stand-alone focal point, without the stem and leaves.  Again, I die-cut it from some patterned paper, but then used Copic markers to add some shading.  Then I scored each "petal" from the tip to the center and folded them upward.  I stamped and fussy-cut a butterfly from the Flap Happy stamp set for the center of the Prickly Bloom.  I created the sentiment using the We Connect set, and stamped it in white ink.  I also created the stamped scalloped edge using a solid circle stamp from Hullabaloo.  Here are some other views of this sweet card:


Thanks SO MUCH for looking!  I am honored to be a part of this sneak peek blog hop.  Have a great day!


Card 1
Supplies: card base: Recollections; patterned papers: Basic Grey; tag: Ranger; stamps, die: Paper Smooches; ink: Tsukineko (Memento Tuxedo Black); sewing machine: Kenmore; quilting thread: Americana; seam binding: Hug Snug; baker's twine: Divine Twine

Card 2
Supplies: card base, rhinestones: The Paper Studio; card stock: The Paper Studio (kraft), Georgia Pacific (white); patterned papers: Basic Grey; stamps, die: Paper Smooches; ink: Joann Craft Essentials (white), TPC Studio (blue); markers: Copic; seam binding: Hug Snug  

Thursday, January 10, 2013

CFC85 - Awesome (you did it!)

Happy Friday to all!  I hope everybody had a great week.  Today I'm going riking with a friend of mine.  Don't know what that is?  Oh, that's probably because it's a word I made up.  It's hiking, but we run when we can.  Last time we went, we did a 14.5 mile trail.  Today, we were going to do a 21.5 miler, but a cold snap is coming through (which is supposed to be the longest one we've had since 1971!!), so we've decided to do a 7.5 miler instead.  Hope we don't freeze to death!!! Anyway, today I'm also bringing you this week's challenge from CAS-ual Fridays! Woo hoo!
CFC85: Round of applause
Create a clean and simple card that celebrates an accomplishment and features at least one circle

And the sponsor for this week's challenge is CAS-ual Fridays Stamps!  The winner of this challenge will receive a $20 store credit!  And guess what else?  There is a new release coming out on January 18th! Check out the stamp blog for sneak peeks January 14-17!

So, on this card, I gave you a little pre-sneak peek of a new stamp set that's coming out.  Can you spot the new stamp on this paper yummy?:


I used some Spellbinders Nestabilities dies on this card (the circle and the star).  I stamped the sentiment onto the circle, then embossed that cool dotted chevron border (Cuttlebug "Charles") above it.  I adhered the circle to the front of the card.  I temporarily adhered the star in place to use as a guide.  Then, using the same "you did it!" stamp that I used on the circle (from the Woot Woot set), I stamped repeatedly around the circle by curving the stamp on my acrylic block to match the curve of the circle.

To create the star, I cut a bunch of 1/8" strips of white cardstock.  I wanted to make sure the rainbow colors on the star matched the inks I was going to be using in the sentiment, so I colored each strip of cardstock using a direct ink-to-paper approach.  Then I place my star die on a separate piece of cardstock and traced around it.  I covered the area inside the tracing with double-sided adhesive, then adhered the colored strips diagonally until the traced outline of the star was completely covered.  Then I die cut that area using the same star die.  I applied some diamond Stickles around the edges of the star, and adhered it using dimensional adhesive.  Here's another view of the sentiment, embossing, and glittery rainbow star:

I hope you'll play along with this week's challenge!  You have until next Thursday at noon EST to do so.  Thanks so much for looking!

Supplies: card stock: Copic X-Press Blending card stock; stamps: CAS-ual Fridays Stamps; inks: Tsukineko (black), TPC Studios (all colors); embossing folder: Cuttlebug by Provocraft "Charles" border; dies: Nestabilities by Spellbinder; die cutting machine: Sizzix; glitter glue: Stickles by Ranger; corner rounder: We R Memory Keepers Corner Chomper

Thursday, January 3, 2013

CFC84 - Thanks

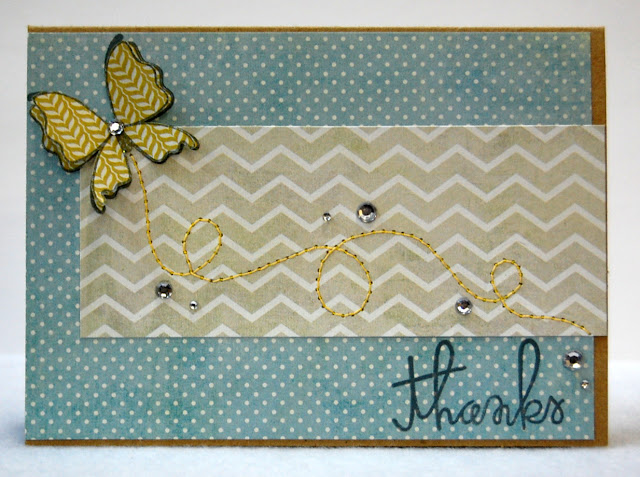
Hello, and happy Friday!  I'm back with this week's CAS-ual Fridays challenge, and I think you'll really find this to be quite a timely challenge: 

Yep, the challenge is to create a thank you card.  Perfect, right?  With Christmas just behind us, who doesn't need a thank you card (or 10?)?  And the wonderful sponsor for this week's challenge is Ellen Hutson
Not only will the winner receive gift certificate to spend in the store, she'll also win a guest designer spot at the CAS-ual Fridays blog!  YAY!  And now for the paper yummies:

For this card, I wanted to paper-piece the butterfly and have a layer whose wings I could pop up.  So I stamped the butterfly image 3 times: once on the background (where the blue and gray papers meet), and twice on the yellow patterned paper. I fussy-cut the two yellow patterned butterflies, then adhered one of them flat onto the background.  With the second yellow butterfly, I placed adhesive only on the "body", not the wings.  I adhered the body of the second on top of the first, then folded the wings upward.

I lightly penciled in a "trail", then machine-stitched over the top with yellow thread:

I added some bling to the butterfly body, and along the trail down to the sentiment:

I really enjoyed making this card!  I hope you'll find the time to play along with this week's challenge.  You have until next Thursday at noon EST to do so!  Thanks so much for looking!

I'm also playing along here:
Paper Smooches SPARKS challenge - Anything Goes


Supplies: card base: The Paper Studio; patterned papers: My Mind's Eye; stamps: Paper Smooches (Flap Happy, Simply Said); ink: Tsukineko (Memento London Fog); rhinestones: The Paper Studio; sewing machine: Kenmore; quilting thread: Americana