Showing posts with label little red wagon challenge. Show all posts

Wednesday, May 30, 2012

October Afternoon 9 to 5 contest - hello

Happy Wednesday, everybody!  I am super excited today, for a couple of reasons.  One is that I just put a deposit on a new (to me) SUV this morning, and I can't wait to get it!  I've been wanting one of these for a few years now.  The other reason I'm so excited is that October Afternoon is having a sketch contest using their 9 to 5 line, which I happened to pick up recently.  It's such a cute collection!  Here's the sketch:

I think this sketch lends itself more to a layout than it does to a card, but I haven't done a layout in years, so I went ahead and turned it into a card.  And now for the paper yummies:

I really loved working with this sketch, and I think the card turned out so cute!  I used Nestabilities dies to cut different sized circles out of several patterned papers, then arranged them according to the sketch.  I popped some of them up with dimensional adhesive:

Then I used some of the cutie buttons from the same collection and arranged them in place of the hearts in the sketch:

I used the alphabet stickers to create the "hello" sentiment.  Then I punched a heart from the black chevron paper, popped it up on dimensional adhesive, and applied Glossy Accents:

I finished the card off with some machine stitching around the edges and under the sentiment.
Thanks so much for looking!

I'm also playing along here:
Crafty Creations Challenge #172: Running in Circles
Little Red Wagon WOOD you? Challenge
Simon Says Stamp Anything Goes Challenge

Supplies: card base: The Paper Studio; patterned papers, alphabet stickers, buttons: October Afternoon; Glossy Accents: Ranger; sewing machine: Kenmore; thread: Singer


Sunday, May 6, 2012

Paper Smooches Cardstock Contest - Wish Big

Hi again!  I'm back with my second card for the Paper Smooches Cardstock Contest.  To see my first card, click here.  The challenge is to make a project using only cardstock - no patterned paper.  I love me some patterned paper, so this was definitely a challenge for me.  But I came up with a couple of pretty cute cards, if I may say so myself :)  Here is my second paper yummy:
I used a few stamp sets to create this card, including the adorable new Alfresco set.  But instead of stamping the hamburger "as is", I decided to do a bit of masking and stamp the patty/cheese over and over again, to create a giant burger.  If you were that cute lil' ant, wouldn't you wish for a burger that size?  LOL :)

I thought it would look cute to have a toothpick sticking out of the burger, so I decided to put my sentiment flag on the toothpick.  I stamped some subtle tone-on-tone polka dots, then created a sentiment from the Alphadot set:
Since there was no patterned paper allowed, I created the "tablecloth" using the gingham stamp from the Debonair set.  I had so much fun creating this card.  The hardest part was trying to determine what color markers I should blend to create a good hamburger patty color.  I guess you just can't find a good meat-colored marker anymore.  What's the world coming to?

I used this sketch from Retro Sketches:
That long narrow strip is what actually inspired me to make a giant stacked 8-patty-8-cheese burger.  I'm also playing along here:

Paper Smooches Cardstock Contest
Retrosketches #10
Creative Inspirations Challenge #161: Animal Antics
Little Red Wagon Challenge #131: Stitch It Up

Supplies: cardstock: Georgia Pacific (white), Core'dinations (gray, yellow), The Paper Company (blue); stamps: Paper Smooches; ink: Tsukineko (black), Hampton Art (red), Clearsnap (yellow); embossing powder: Hampton Art; markers: Prismacolor; baker's twine: Divine Twine; dimensional adhesive: American Crafts; sewing machine: Kenmore; thread: Singer; toothpick: craft supply; hole punch: We R Memory Keepers

Wednesday, April 11, 2012

Paper Smooches April Guest Designer, week 2

Hello, everybody! I'm here to share the cards for the second week of my guest designer term at the Paper Smooches blog. This week, Kim chose to feature these two cards, which were both made using the Get Outta Town stamp set. It's SO crazy cute! Lotsa great images and sentiments!

For the first card, I created a little island scene. My"island" is actually the oval around the cameo in the Pretty Momma set (which I used in last week's cards). I love finding other ways to use stamps! And if you'll look closely here, you'll see another example: the bird up in the sky is what I used to create the waves below. I just stamped him a bunch of times in succession, and fussy-cut each layer. I love the way it turned out. Now for the paper yummies:

So I've never really used watercolor paper, but I had some in my stash. So I pulled it out, and used it to make my sky background. But instead of using watercolor pencils, I used Tim Holtz distress ink and a blending tool to apply it to the paper. Then I went in with a water brush and randomly added some "clouds". I also used the cloud stamps from Paper Smooches Metropolis set. I stamped them in white ink, then colored them in with a white gel pen. I stamped and second-hand stamped the bird so one would look further away. Here's a closer view:


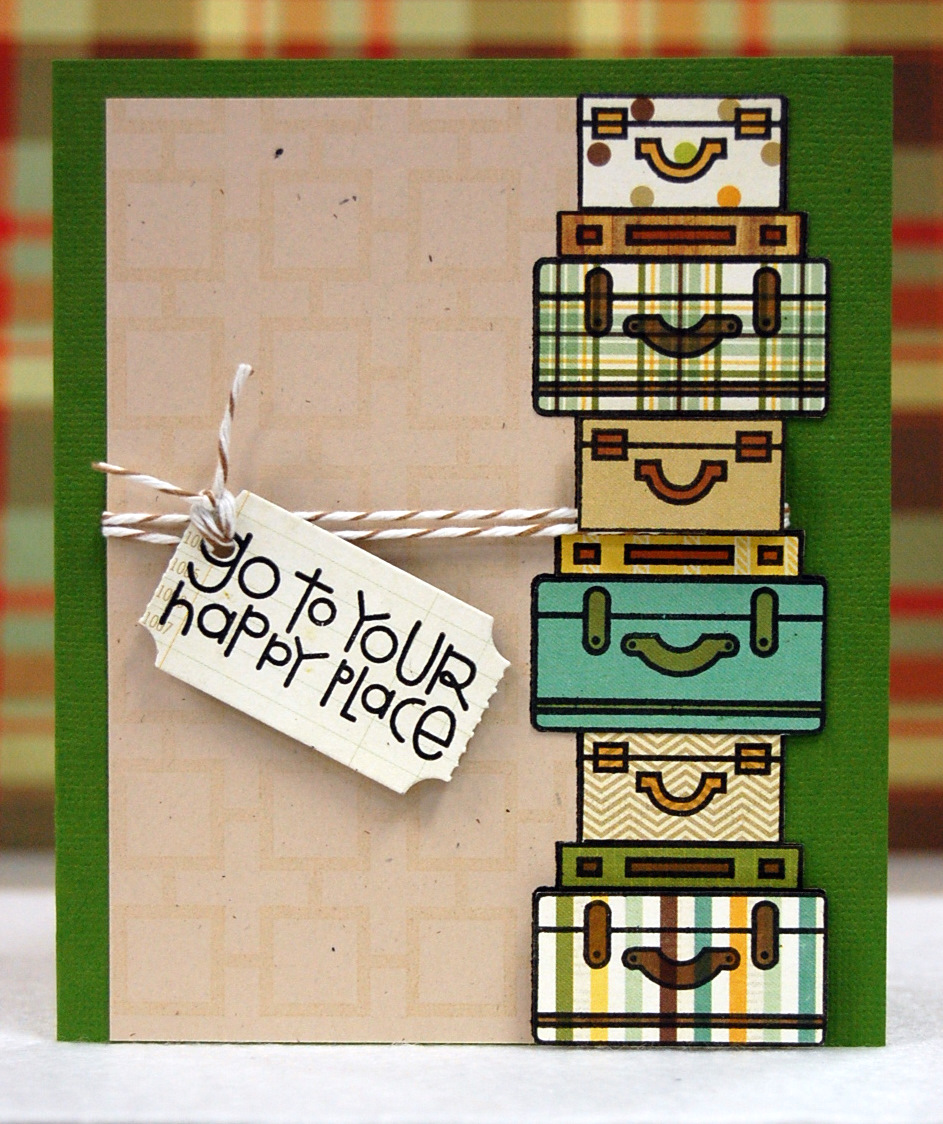
For my other card, I just HAD to use the cute luggage stamp. And it begged me to paper-piece it. The stamp itself is three stacked suitcases, but I just kept stacking them. First I stamped the Hip to be Square background onto the natural colored cardstock (very subtly - it may not be visible in the pictures). Then I stamped the luggage stamp three times, and fussy-cut the right edge of the cardstock along the lines of the luggage. Then I paper-pieced each suitcase using patterned paper from the Echo Park This & That Charming 6x6 pad. I colored the clasps and handles using Prismacolor markers. More paper yummies:

For the sentiment, I die-cut a ticket from ledger paper (from the same pad as the luggage) using a Papertrey Ink ticket strip die. I stamped the sentiment onto the ticket, and tied it on with baker's twine. Close-up:
I still can't believe I'm actually guest designer for Paper Smooches...although I am on a bit of a roll here lately with all kinds of exciting news coming my way. Stay tuned... :)

Card 1 is playing along with these challenges:
Lawnscaping Challenge 31: Coloring
Little Red Wagon Spring Colors Challenge
The Ribbon Carousel Sketch challenge

Card 2 is playing here:
Crafty Catz Challenge #127: CAS
Paper Pretties Wednesday Challenge PWC201: 2 or more designer papers (I used 10!)
The Pixie Cottage Challenge 116: paper piecing

Wednesday, February 22, 2012

Get your LEARN on

Here is a school-themed card I made using the "A Boy's Life" 6x6 paper pad from Echo Park. This pad has so many great, usable patterns in it. I thought that this letter pattern was too cool to not make a school-related card with it. I used the scraps from the paper to cut out "LEARN" with my craft knife (I also took a couple letters from an area of my background piece that I knew would be covered). I also used some Mint Motif stamps to create a star-shaped chipboard button and a little paper-pieced chipboard pencil, and some Hero Arts alpha stamps to complete my sentiment. Now for the paper yummies:


To create the star "button" (under the pencil), I stamped the star on chipboard and on the blue patterned paper. Then I cut out the blue star and adhered it onto the chipboard star. I cut out the chipboard star, punched two "button holes" in it with my Crop-a-dile Big Bite, then covered the star with Glossy Accents. For the pencil, I stamped on chipboard and onto the cute yellow striped patterned paper, then cut just the barrel of the pencil out of the yellow paper. I pieced it onto the barrel of the chipboard pencil, then colored the wood and eraser portions of the pencil with Prismacolor markers. I cut out the paper-pieced chipboard pencil, and secured it on top of the star with some baker's twine. I added silver Stickles to the part of the pencil that would be metal. I also added Glossy Accents to the letters in "LEARN". Here's a closer view:

I am entering this card here:
Little Red Wagon chipboard challenge

Thanks for looking!

Supplies: cardstock: Recollections; patterned papers: Echo Park; stamps: Mint Motif (writing line, star, pencil), Hero Arts (alphabet stamps); ink: Tsukineko; embossing powder, dimensional adhesive: American Crafts; markers: Prismacolor; scallop edge punch: EK Success; hole punch: We R Memory Keepers; Glossy Accents, glitter glue: Ranger; ribbon: craft supply; baker's twine: Divine Twine; craft knife: Fiskars; sewing machine: Kenmore; thread: Singer